
Click “Create MyFarms Account” To Get Started
Clicking “Create MyFarms Account” will take you to the MyFarms Account Registration form. After completing the form, you will receive an email from MyFarms containing a link to setup a password and login to your account. MyFarms never shares personal information with third parties and will only use your email address to share important MMP support information.
Manure Setback Map User Guide
Contents
- 1. Introduction
- 2. Create Your MyFarms Account
- 3. Tools For Advisors
- 4. Use The Navigation Assistant
- 5. Define Farms and Fields
- 6. Create Setback Maps
- 7. Download the Setback Map PDF
- 8. Get More Support: PDF Tutorial
- 9. Tutorial Video
1. Introduction
- Who should use MyFarms to generate Manure Setback Maps?
- Advisors – We refer to both Technical Service Providers (TSPs) and Crop Consultants as
“Advisors” throughout this document. Advisors can use MyFarms to setup an account, field boundaries,
and manure application setback maps on behalf of each grower-client. For more information,
see "Tools for Advisors”.
- Growers – Growers are also welcomed to register their own MyFarms account, setup field boundaries,
and generate their own manure setback maps, although many will opt to allow their advisor to
perform these tasks on their behalf.
- Advisors – We refer to both Technical Service Providers (TSPs) and Crop Consultants as
“Advisors” throughout this document. Advisors can use MyFarms to setup an account, field boundaries,
and manure application setback maps on behalf of each grower-client. For more information,
see "Tools for Advisors”.
- When should I use MyFarms to generate Manure Setback Maps?
- Before or After Writing a CNMP – Setback maps can be created before, during,
or after an advisor writes a Comprehensive Nutrient Management Plan (CNMP)
for a grower-client. Simply snip and paste the setback maps out of the PDF
into your CNMP Word document or print the setback map PDF and physically
place the printed maps in your printed CNMP.
- With or Without MMP – Many advisors use one or more tools other than Manure Management Planner (MMP) to write their CNMPs. MyFarms can be used to generate setback maps for a CNMP, whether the advisor uses MMP or not.
- Before or After Writing a CNMP – Setback maps can be created before, during,
or after an advisor writes a Comprehensive Nutrient Management Plan (CNMP)
for a grower-client. Simply snip and paste the setback maps out of the PDF
into your CNMP Word document or print the setback map PDF and physically
place the printed maps in your printed CNMP.
2. Create Your MyFarms Account
- For the optimal MyFarms experience, we recommend using Google Chrome on Windows devices and Safari on iOS devices. Download a free copy of Chrome: here
- Scroll up and click the [Create MyFarms Account] button.
- Enter the requested data, select the Grower or Advisor toggle, and complete the registration process.
- Note: If you already have a MyFarms account, be sure to login to your existing account, rather than creating a new one. This will prevent duplicate data entry.
- After finding your activation email (be sure to check your junk / spam folder), click the link in that email to create your password, then login to MyFarms for the first time.

Advisors should proceed to Section 3, "Tools for Advisors" and growers can skip ahead to Section 4, "Use The Navigation Assistant".
3. Tools For Advisors
This section is specifically for advisors; growers can skip ahead to the next one.- Dashboard
Now that you are logged into MyFarms as an advisor, you will have access to the [Dashboard] button at the top of MyFarms. When open, you can choose to access one of these two systems.

- Portal - This system is for administrative purposes. It is where advisors
register grower-clients, monitor account activation progress, retrigger activation
emails (if necessary), and reset passwords for growers (upon request).
- Grower - This system is where advisors and growers will spend most of their
time. It is where both groups can create field boundaries, manure application setback
maps, and produce the Manure Setback Map PDF, on behalf of one or more growers.
- Portal - This system is for administrative purposes. It is where advisors
register grower-clients, monitor account activation progress, retrigger activation
emails (if necessary), and reset passwords for growers (upon request).
- Register your Grower(s)
Advisors should begin by following these steps for each grower-client they want to serve through MyFarms.
- Open the [Dashboard] and select [Portal].
- Click the [Register] button and fill out the form for a grower-client (only the name and email address are required).
- Click one of two buttons in the lower right corner of the page:
- [Register + Authenticate] – Click this button to send an activation email to the grower, inviting them to create a password, and to login to the MyFarms account you are creating on their behalf. This enables them to access the data you create for them in addition to contributing their own.
- [Register] – Click this button to not send an activation email to the grower, which will enable you to enter all the required data for them.
- Repeat the above two steps for each grower-client.
- Note: After registering each grower-client, you can monitor account activation progress by
clicking the [Users] page in the portal, which will list each user you have registered. The
“Status” column communicates one of four messages:
- Incomplete – The “Edit User” form is missing the name and / or email address. Click the blue pencil icon to the right of the user’s name to fill in the missing pieces.
- Complete – You have entered the user’s name and email address in the user form.
- Email Sent – You clicked [Register + Authenticate] (see above) and the grower has not yet clicked the link in the email and created a password. They have 48-hours to complete this step before the link in the activation email expires and the status reverts to “Complete”. If this happens, simply click the blue pencil icon, and click [Register + Authenticate] again, which will restart the 48-hour clock.
- Authenticated – Congratulations! The user received the activation email, clicked the link, created a password, and logged in for the first time.

- SAFELink to Grower
After an advisor has registered one or more grower-clients, it’s time to get started entering their data into MyFarms. To begin, follow these steps:
- Open the [Dashboard] and click [Grower].
- Open the SAFELink dropdown and select a grower-client. Now, the field boundaries, features maps, and setback maps you create
will be entered into the grower’s account.

- Open the [Dashboard] and click [Grower].
4. Use The Navigation Assistant
Along the right side of MyFarms you will find the “Navigation Assistant”. If you don’t see it, simply hover on the right edge of your screen until a small tab appears, then click it to open the panel. Here are some highlights to streamline your MyFarms experience.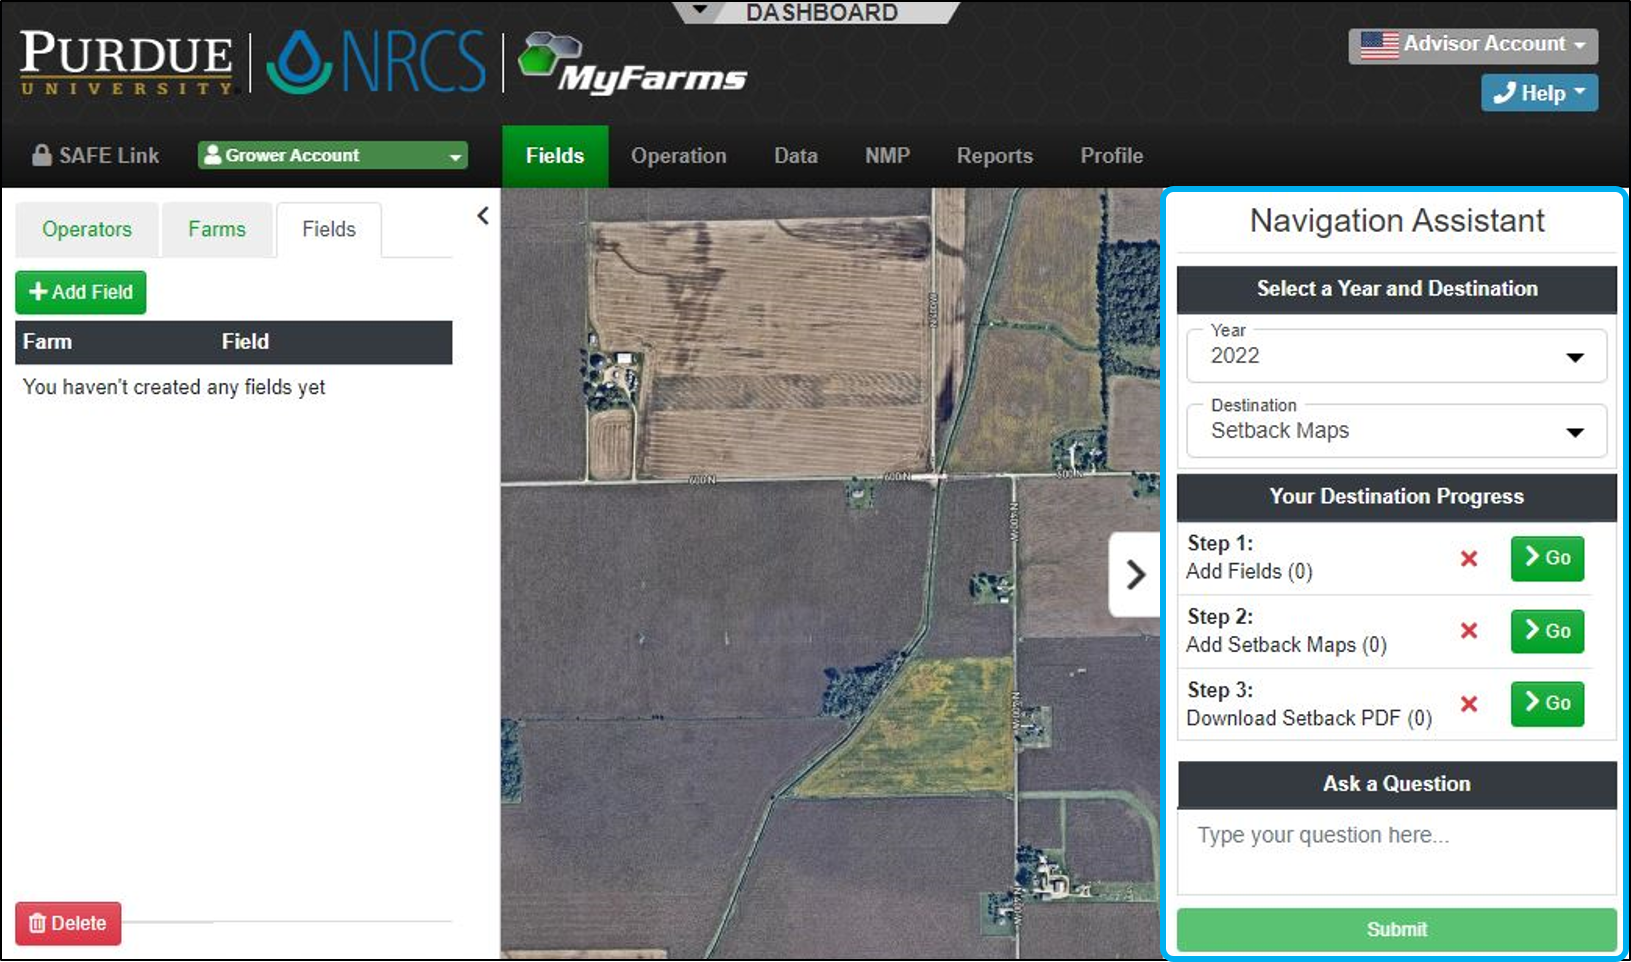
- Destinations – MyFarms will add a variety of “Destinations”, but to start with, you will see “Setback Maps”.
Each destination has its own unique set of steps and shortcuts, designed to make navigating to each destination
as simple as possible.
- Year – The “Step Data” (next bullet) is populated based on the selected Year and SAFELinked grower combination,
so make sure the year matches the starting year on the MMP page.
- Step Data – Following each step instruction is a number in parenthesis, which indicates the number of records
associated with the grower, year, and step combination, which makes it easy for advisors to see how much data is already in MyFarms for each grower-client.
- Status – A red “x” means no data has been entered for the step, while a green checkmark means that at least one record has been created. This doesn’t necessarily mean you’re done, but that you have at least begun the step for the grower and
year combination.
- Go – These buttons are shortcuts to places in the system where additional records associated with each step can be created.
5. Define Farms and Fields
- The important relationship between farms and fields
MyFarms makes it easy for users to control how many field boundaries they want to include in each setback map image; this is handled through the relationship between “farms” and “fields”. Setback map images are generated at the farm level. So, if you want to include three field boundaries in the same setback map image, simply assign all three fields to the same farm. Or, if you want to generate one setback map per field, make sure each field is associated with a different farm. Keep reading to find out how.
- Add Field Boundaries – Cloud Connections
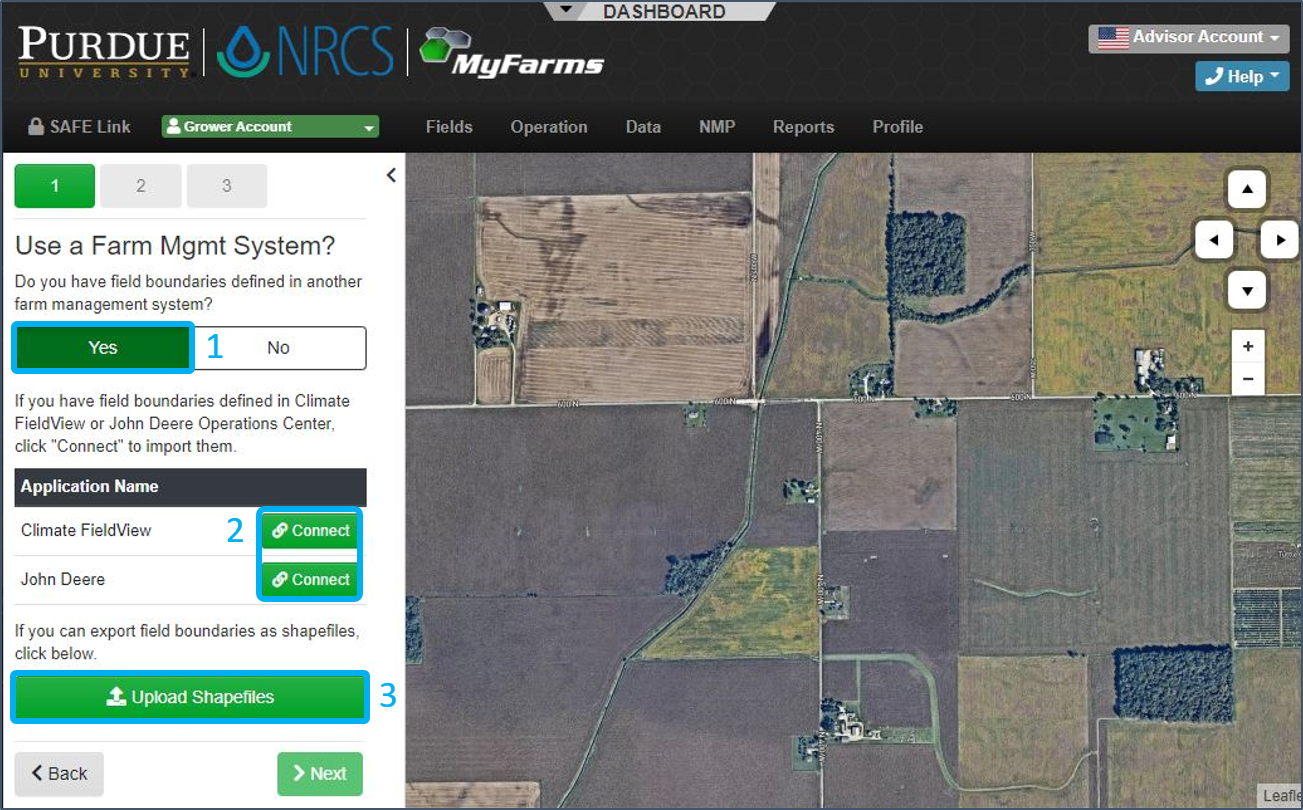
- Click [Fields], then [+Add Field].
- Set the “Use a Farm Mgmt System?” toggle to [Yes] (see #1 in the image below)
- Link the user’s MyFarms account to their FieldView or John Deere account by clicking [Connect] next to the appropriate application (see #2 in the image below). Making this connection requires knowing the user’s username and password for the other application. Once made, new data will flow automatically from the cloud connection to MyFarms.
- Confirm farm and field names and verify that all fields that should be included in the same setback map are associated with the same farm.
- Add Field Boundaries – Shapefile Upload
- Export field boundaries as shapefiles from a third-party system and save them to your flash drive or hard drive. Be sure to note the location.
- Click [Fields] then [+Add Field]
- Set the “Use a Farm Mgmt System?” toggle to [Yes], then click [Upload Shapefiles] (see #3 in the image below).
- Click [Add Files] and select the shapefiles you saved previously, click [Open], then [Submit].
- Confirm farm and field names and verify that all fields that should be included in the same setback map are associated with the same farm, then click [Save].
- Add Field Boundaries – Drawing Tools
- Click [Fields], then [+Add Field]
- Set the “Use a Farm Mgmt System?” toggle to [No]
- Find the field by entering an address, crossroads, geospatial coordinates, then press [Enter] or click [Go]. After you find the field on the map, click [Next].
- In most parts of the country, MyFarms can automatically select the field boundary geometry that contains your search coordinates, but feel free to click additional shapes, as appropriate, and click [Next].
- Optionally use the drawing tools (upper left corner of the map window) to improve the field boundary shape, then click [Next].
- Enter the field name then either select the farm or add a new farm by clicking “+” in the farm dropdown, then click [Next].

6. Create Setback Maps
- Click [NMP] in the navbar (see #1 in the image below).
- In the Sidebar (see #2 in the image below)
- Select the [State] (if you created field boundaries in more than one state)
- Set the [Start Year], [Start Month], and [Plan Years], then click [Start New Plan].

- On Step 1
- Select the field(s) for which you want to create setback maps, then click [Next].
- Note: Field boundaries not in the state you selected in the sidebar (see above) will be inactive.
- On Step 2
- Identify which farm(s) will receive manure during the plan term and click [Add Map] to create a Feature Map
for each farm that receives manure.
- Note: if any farm is associated with more than one field boundary selected on step 1, you will add all their features to the same map.
- To add a feature to the map, simply click [Add New Feature], fill out the “Setback Feature Details” dialog,
click [Save], then immediately begin drawing the associated feature on the map.
- Note: the feature geometry type (polygon, line, or point) is based on the [Feature Name] you selected in the “Setback Feature Details” dialog.

- Identify which farm(s) will receive manure during the plan term and click [Add Map] to create a Feature Map
for each farm that receives manure.
- On Step 3
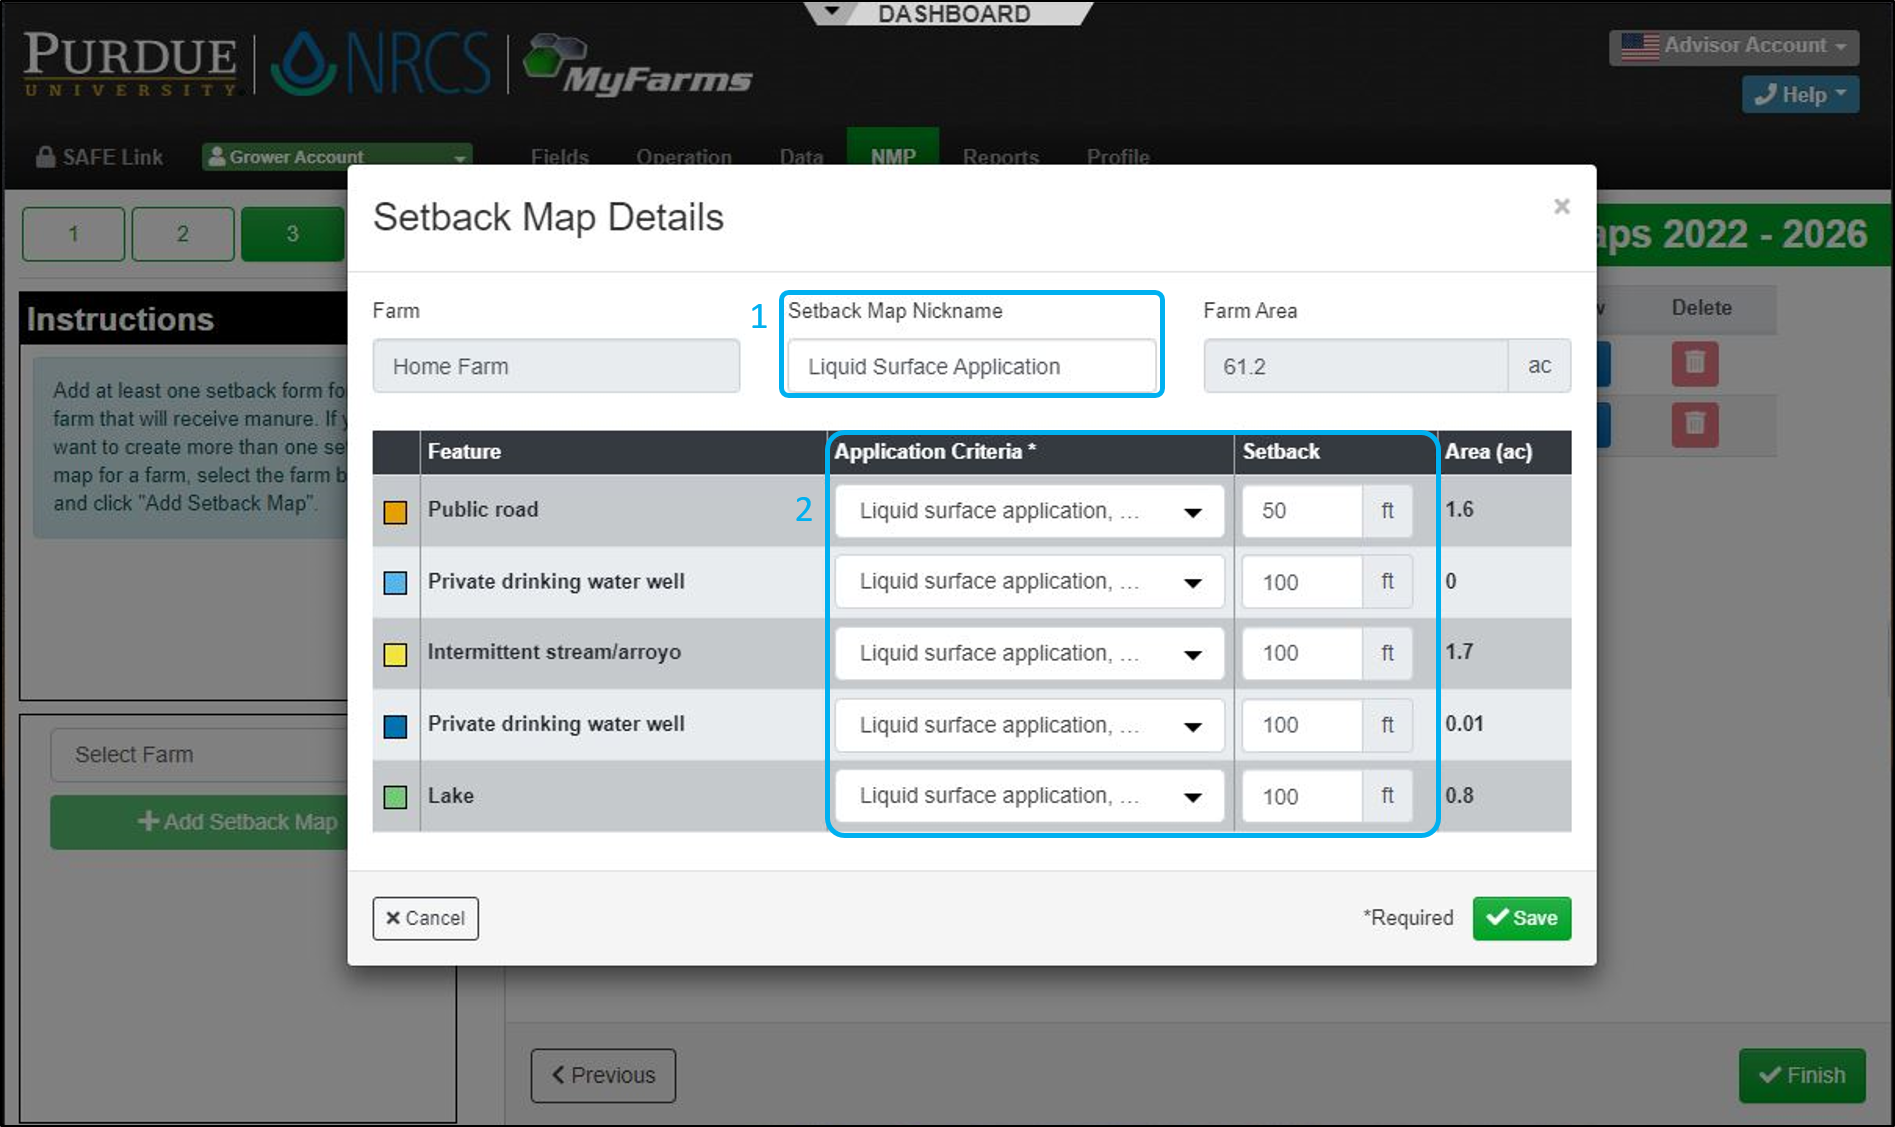
- Click [Add Form] to open the “Setback Map Details” dialog.
- Enter a “Setback Map Nickname” so you can easily identify the map. The nickname could be based on application method, or anything else that distinguishes it from other maps for you (see #1 in the image below).
- Select the “Application Criteria” associated with each feature (defined previously on step 2)
- Finalize the setback distance. These values are set to the minimum setback distance by default, but you can increase them as needed (see #2 in the image below).
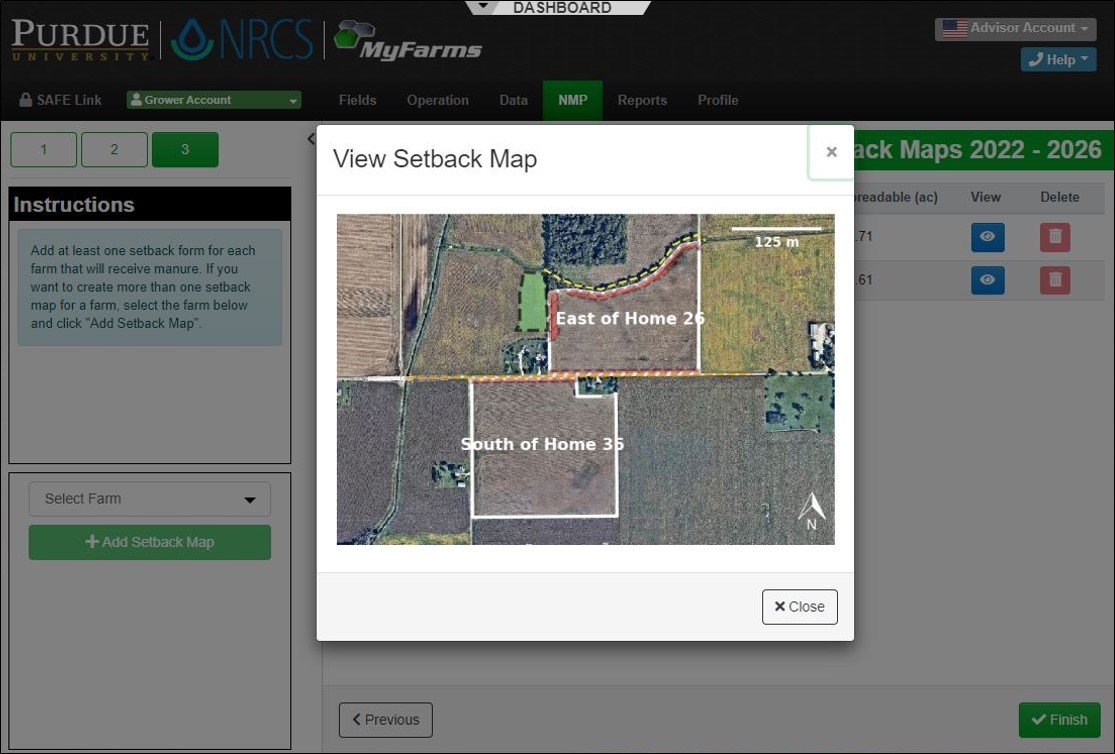
- Optionally, add more setback maps by selecting a farm in the sidebar and then clicking [Add Setback Map]. This option makes it easy to explore how different manure application practices affect total spreadable acres.
- Optionally, preview your setback map(s) by clicking the [View] button, then click [Save]. (See Setback Map example in the second image below.)
7. Download the Setback Map PDF
After creating a setback map for every field that receives manure, follow these recommended steps.
- Open the Navigation Assistant and set the [year] to the “Start Year” of the plan you created above (Section 6, Point 2).
- Click the [Go] button next to Step 3 in the Navigation Assistant (see #1 in the image below).
- Click the [Download] button under the automatically selected [Setback Map Book] button (see #2 in the image below).
- Use the browser tools to open and / or save the returned PDF to your local PC.

8. Get More Support
MyFarms: mmpsupport@myfarms.com / (260) 693-7671 (8:00 – 4:00 CT, Monday thru Friday)
Last updated: July 8th, 2022